7 November 2010

Building a tree with ASP.NET MVC 2 template - part 1 - The basics


Introduction


Few months back I had to build a tree with selectable branches as part of a user story. This article describes the first step in the development of the tree. ASP.NET MVC 2 has a feature called template. A template is new kind of strongly typed partial view used in conjunction with the new Html.DisplayFor and Html.EditorFor methods introduced in MVC 2. When we call Html.DisplayFor() on a property of a view model, MVC will look for a template for that type and render it accordingly.

In this article I will be rendering a hierarchical tree as a html list. I will keep it very simple and won’t be adding any styling or behaviours. I'll do those in next articles. I’m only interested in showing how the ASP.NET MVC 2 behaves when dealing with templates.

Creating a new ASP.NET MVC 2 project


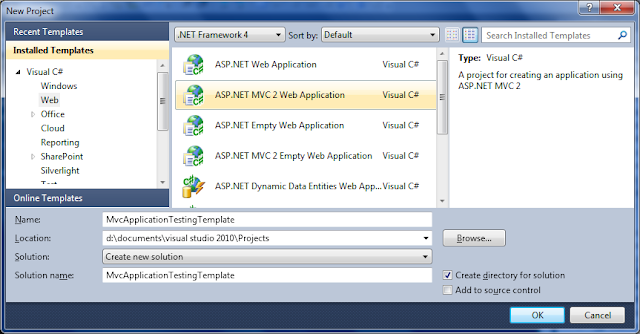
Let’s create the project. We’ll use the default ASP.NET MVC 2 web application template so that we can quickly start displaying something. The hardest part here is to find a name for the project.


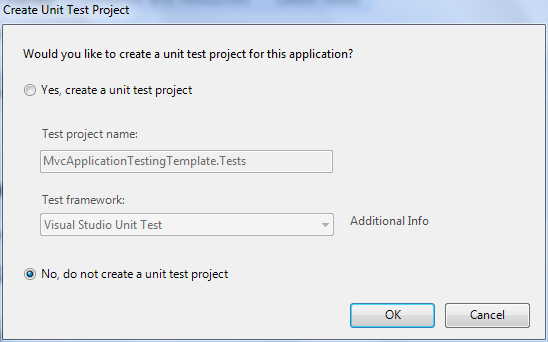
After that, Visual Studio will ask you if you want to create a test project for the project. If we were writing production code the answer would be “of course” but this is a spike project only intended to explain something in my case and to test an MVC 2 feature in your case. So we don’t need a test project for now.


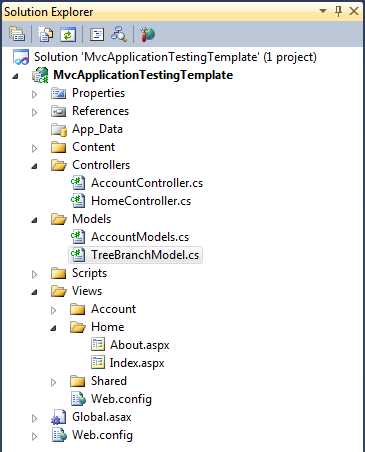
Alright! So now we have a new project. Solution Explorer should look like the following:


Run the application to make sure we have something working before adding anything.

Creating the tree branch view model


So now we need to define what a branch is. For now we only need to have name for the branch as well as a list of children.

Add a class to the Models folder in Solution Explorer. Let’s call it TreeBranchModel.


Open up the new class and add the Name and Children properties.

using System.Collections.Generic;

namespace MvcApplicationTestingTemplate.Models
{
    public class TreeBranchModel
    {
        public string Name { get; set; }
        public IList<TreeBranchModel> Children { get; set; }
    }
}

Notice that the children property is a list of TreeBranchModel as they are also branches that can have children.

Creating the template

In order for MVC to associate a view model to a template and be able to use the DisplayFor() type of method we need to create a template with the same name as the view model. The template will also need to be under the DisplayTemplates folder.

When using DisplayFor() in a view or another template, MVC looks first in the same area where the call is made for the DisplayTemplates folder. If it cannot find a template for the requested type it will then look in the Views/Shared/DisplayTemplates folder. The latter folder can be very useful to define template used on the whole website such as DateTime.

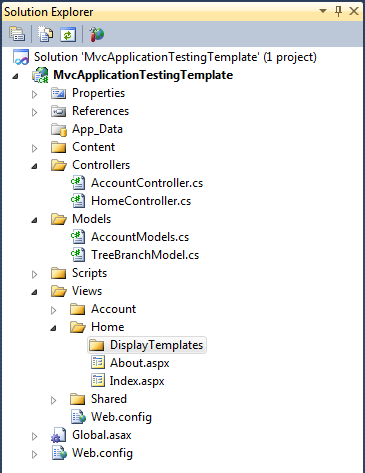
In our case the template will only be used in the same area so we’ll just create a DisplayTemplates folder as follow:


The next step is to add a new MVC 2 view user control to the DisplayTemplates folder. Don’t forget to use the same name as for the view model otherwise we won’t be able to use the MVC 2 “magic”.


Solution Explorer should look like this:


Let’s edit the template. The first thing is to strongly type the template so it knows what view model to expect. Then just add the html to display a tree branch.

<%@ Control Language="C#" Inherits="System.Web.Mvc.ViewUserControl<TreeBranchModel>" %>
<%@ Import Namespace="MvcApplicationTestingTemplate.Models" %>

<ul>
    <li><%: this.Model.Name %></li>
    <%: this.Html.DisplayFor(m => m.Children) %>
</ul>

We just display the name of the branch as the actual list item then we call the DisplayFor() method on the view model Children property. MVC will reuse the same template to display the children recursively as Children property is a list of TreeBranchModel. So we leave the hard work to MVC and just relax and have a cup of tea.

Trying out the tree


The first step is to modify a controller action to populate a tree branch view model with some test data and then pass it down to a view.
As we’ve create a default ASP.NET MVC 2 web application we already have some controllers. Let’s pick the home controller and just modify the index action.

using System.Collections.Generic;
using System.Web.Mvc;
using MvcApplicationTestingTemplate.Models;

namespace MvcApplicationTestingTemplate.Controllers
{
    [HandleError]
    public class HomeController : Controller
    {
        public ActionResult Index()
        {
            return View(BuildRootBranch());
        }

        private static TreeBranchModel BuildRootBranch()
        {
            var firstRootBranchChildChildModel = new TreeBranchModel
            {
                Name = "RootBranch Child1 Child"
            };

            var firstRootBranchChildModel = new TreeBranchModel
            {
                Name = "RootBranch Child1",
                Children = new List<TreeBranchModel>
                { 
                    firstRootBranchChildChildModel 
                }
            };

            var secondRootBranchChildModel = new TreeBranchModel
            {
                Name = "RootBranch Child2"
            };

            return new TreeBranchModel
            {
                Name = "RootBranch",
                Children = new List<TreeBranchModel>
                {
                    firstRootBranchChildModel, 
                    secondRootBranchChildModel 
                }
            };
        }

        public ActionResult About()
        {
            return View();
        }
    }
}

BuildTreeBranch() is just a method to create some test data and populate the main tree branch called root branch.

The index action will build a root branch containing two children. The first child of the root branch will also contain a child. The action will then pass the root branch down to the index view.

The last thing that we need to do is to modify the index view to handle the view model. Let’s make it a strongly typed view accepting a view model of type TreeBranchModel.

<%@ Page Language="C#" 
    MasterPageFile="~/Views/Shared/Site.Master" 
    Inherits="System.Web.Mvc.ViewPage<TreeBranchModel>" %>
<%@ Import Namespace="MvcApplicationTestingTemplate.Models" %>


    Home Page


    <%: this.Html.DisplayForModel() %>


Because the view is strongly typed for the TreeBranchModel view model we can call the Html.DisplayForModel(). The DisplayForModel() is another new method to deal with templates. This method renders the view model of the strongly typed index view.

If you run the application you should get something like this:


The generated html for the tree is simple and clean.

<ul>
    <li>RootBranch</li>
    <ul>
        <li>RootBranch Child1</li>
        <ul>
            <li>RootBranch Child1 Child</li>
        </ul>
    </ul>
    <ul>
        <li>RootBranch Child2</li>
    </ul>
</ul>

Conclusion

In this article we saw how to use the new ASP.NET MVC 2 template feature to display a tree in a minimum of effort. The missing things now are the css styling and a way to collapse/expand the branches. I’ll write other articles for those in a near future.

28 January 2010

Pair programming is great but tiring

Introduction

Pair programming offers lots of advantages such as better quality of code (constant reviewing), less code (constant refactoring) and better communication within the team (knowledge transfer). Because you are always focusing to either comment on the code that the driver is writing or either write code while listening to your peer, you quickly get tired.

Workspace setup

To limit this effect, a good thing is to setup the workspace so that you can both work comfortably on the same machine. Some of my colleagues like to have a laptop they can use while the other drives so they can quickly search for documentation or articles related to the area they are working on.

Learn from each other

I think that pair programming is more tiring if you are working with someone with more experience than you, because you have to make an effort to not make too many mistakes. If you were on your own you could just try things. With pair programming, you could still do it but only if your peer doesn't have a direct solution to the problem.

You can learn so many diverse things when pair programming. I sometimes work with more senior developers and, of course, I learn good practices and stuff, but not only. Something as simple as setting up your IDE properly can greatly increase you productivity. Pressing a keyboard button (to run all tests in current context or clean unused using or import statements in a file) or a sequence of buttons (comment, uncomment a piece of code or open a specific window) is far quicker than right clicking somewhere then selecting an item in a menu. If you pair program with someone that has much more experience than you, you are forced to try to work at the same speed. You also have to concentrate at all time to pick up anything you can. It is very tiring but you learn so much :)

Anger Management

Another thing that you need to have if you don't want to end up fighting with your peer is diplomacy and humility. You have to be prepared to accept criticism. Not all the time of course we all have bad days especially on Mondays. Taking a 5 minutes break helps a lot sometimes.

Time Management

Based on the Pomodoro technique, our team found good ways to make pair programming less tiring. By working for 25 minutes, taking a break of 5 minutes then swapping the keyboard/mouse for another 25 minutes and so forth, you can work the same way for weeks. We more often do 25 minutes each then 10 minutes break but I believe it is because we know each other habits and are used to them so we can hold a bit longer :) You could still work for hours by passing the keyboard/mouse every 25 minutes but you would both look like zombies after few weeks. Life is too short.

Conclusion

The use of Pair Programming combined with other good practices is pretty much bound to your boss understanding that great developers write great code. And if that code is well utilised, it can make a business successful.

23 January 2010

Test Driven Development Applied [part 1]


Introduction

Today I’m starting a series of articles about test driven development. By reading blogs about this subject I realised the lack of simple examples on how to apply TDD properly when creating a new entity. I’ll be starting by defining an interface for a song (could have been something else but I was listening to music while coding) then write tests following some acceptance criteria.

I’ll be using Microsoft unit testing libraries with Visual Studio 2008 but you could also use NUnit. I’ll be coding using C#.

I won’t be commenting much or using regions in my code otherwise this article would be unreadable. I’m not a big fan of comments anyway.

The Song entity

Let me define some acceptance criteria before I can start coding:

A song should have an id greater than zero and a name that cannot be null or an empty string. An exception should be thrown if one of these criteria is not met. The properties should only be set by the constructor ensuring that the entity is in a valid state when instantiated.

Before I write any tests I know that the Song interface should look like the following:

public interface ISong
{
    int Id { get; }

    string Name { get; }
}

Write failing Test -> Make the test pass -> Refactor -> ReRun test


First of all there are people that like to test more than one thing in a test method. When you start using TDD you often don’t really know what to test first so it is better to be very specific about what is being tested.

It’s often a good idea to make a list of the tests that you can think of to get started. Because the acceptance criteria are very clear I can make a nice list.

Test 1: The constructor should throw an exception when passing a negative id.
Test 2: The constructor should throw an exception when passing zero as the id.
Test 3: The constructor should throw an exception when passing a null name.
Test 4: The constructor should throw an exception when passing an empty string as the name.
Test 5: The constructor should set the Id property with the id parameter.
Test 6: The constructor should set the Name property with the name parameter.


Let’s write the first test.

[TestClass]
public class SongTests
{
    [TestMethod]
    public void Constructor_NegativeIdParameter_ThrowsException()
    {
        try
        {
            var song = new Song(-1, "my song name");
            Assert.Fail();
        }
        catch (ArgumentException)
        {
        }
    }
}

I use the following notation for the name of the test methods:

[Method being tested]_[Condition to get the expected result]_[Expected result]


By having a first failing test, I can start writing part of the Song class.

public class Song : ISong
{
    public int Id { get; private set; }

    public string Name { get; private set; }

    public Song(int id, string name)
    {
        if (id < 0)
        {
            throw new ArgumentException();
        }
    }
}

The test is now succeeding with the minimum implementation.

The second test:

[TestMethod]
public void Constructor_ZeroIdParameter_ThrowsException()
{
    try
    {
        var song = new Song(0, "my song name");
        Assert.Fail();
    }
    catch (ArgumentException)
    {
    }
}

The test is failing. We need to modify the constructor a little bit:

public class Song : ISong
{
    public int Id { get; private set; }

    public string Name { get; private set; }

    public Song(int id, string name)
    {
        if (id <= 0)
        {
            throw new ArgumentException();
        }
    }
}

We have another successful test.

From here we can start refactoring the test class to get rid of the duplication.

[TestClass]
public class SongTests
{
    [TestMethod]
    public void Constructor_NegativeIdParameter_ThrowsException()
    {
        ThrowsArgumentException(() => new Song(
            -1,
            "my song name"));
    }

    [TestMethod]
    public void Constructor_ZeroIdParameter_ThrowsException()
    {
        ThrowsArgumentException(() => new Song(
            0,
            "my song name"));
    }

    private static void ThrowsArgumentException(Action action)
    {
        try
        {
            action();
            Assert.Fail();
        }
        catch (ArgumentException)
        {
        }
    }
}

Run the two tests again to make sure they still pass.

We can now test that the constructor checks that the name parameter is not null.

[TestMethod]
public void Constructor_NullNameParameter_ThrowsException()
{
    ThrowsArgumentException(() => new Song(
        1,
        null));
}

Modify the constructor accordingly.

public Song(int id, string name)
{
    if (id <= 0)
    {
        throw new ArgumentException();
    }

    if (name == null)
    {
        throw new ArgumentException();
    }
}

The test should pass and we can get rid of the duplication in the constructor as well as extracting complexity to different methods.

public class Song : ISong
{
    public int Id { get; private set; }

    public string Name { get; private set; }

    public Song(int id, string name)
    {
        GreaterThanZeroIntChecker(id);
        NonNullStringChecker(name);
    }

    private static void GreaterThanZeroIntChecker(int parameter)
    {
        ThrowArgumentExceptionIfTrue(parameter <= 0);
    }

    private static void NonNullStringChecker(string parameter)
    {
        ThrowArgumentExceptionIfTrue(parameter == null);
    }

    private static void ThrowArgumentExceptionIfTrue(bool condition)
    {
        if (condition)
        {
            throw new ArgumentException();
        }
    }
}

Run the tests.

The Song class starts to look better. Let’s write a test for the constructor to throw an exception when passing an empty string as the name parameter.

[TestMethod]
public void Constructor_EmptyNameParameter_ThrowsException()
{
    ThrowsArgumentException(() => new Song(
        1,
        string.Empty));
}

We can modify the constructor and the NonNullStringChecker method.

public class Song : ISong
{
    public int Id { get; private set; }

    public string Name { get; private set; }

    public Song(int id, string name)
    {
        GreaterThanZeroIntChecker(id);
        NonNullOrEmptyStringChecker(name);
    }

    private static void GreaterThanZeroIntChecker(int parameter)
    {
        ThrowArgumentExceptionIfTrue(parameter <= 0);
    }

    private static void NonNullOrEmptyStringChecker(string parameter)
    {
        ThrowArgumentExceptionIfTrue(string.IsNullOrEmpty(parameter));
    }

    private static void ThrowArgumentExceptionIfTrue(bool condition)
    {
        if (condition)
        {
            throw new ArgumentException();
        }
    }
}

Make sure the tests still pass.

Now that we’ve tested the parameters of the constructor we can check that the Id property gets set properly.

[TestMethod]
public void Constructor_ValidParameters_SetsIdProperty()
{
    // Arrange
    int id = 1;

    // Act
    var song = new Song(id, "my song name");

    // Assert
    Assert.AreEqual(id, song.Id);
}

The test fails as expected so modify the constructor.

public Song(int id, string name)
{
    GreaterThanZeroIntChecker(id);
    NonNullOrEmptyStringChecker(name);

    this.Id = id;
}

The tests should pass. Let’s write the last test that checks that the constructor sets the Name property.

[TestMethod]
public void Constructor_ValidParameters_SetsNameProperty()
{
    // Arrange
    string name = "my song name";

    // Act
    var song = new Song(1, name);

    // Assert
    Assert.AreEqual(name, song.Name);
}

The test fails. Modify the constructor as follow.

public Song(int id, string name)
{
    GreaterThanZeroIntChecker(id);
    NonNullOrEmptyStringChecker(name);

    this.Id = id;
    this.Name = name;
}

All the tests should succeed. We now have all the tests that we need to meet the acceptance criteria defined in the introduction.

From here you could actually say that you have done enough but I personally prefer to randomise the values that I use for my tests. It would be nice if I could just use the Random class and call methods on it to get a random int and a random string. The solution is to write extension methods for the Random class.
The extension methods will only be used for testing purpose. I believe there is no need to test methods that are not used in your production source code and that are only there to generate random values.

public static class RandomExtensions
{
    public static string NextString(this Random random)
    {
        return Guid.NewGuid().ToString();
    }

    public static int NextGreaterThanZero(this Random random)
    {
        return random.Next(1, int.MaxValue);
    }
}

Here is the final version of the test class:

[TestClass]
public class SongTests
{
    private Random random = new Random();

    [TestMethod]
    public void Constructor_NegativeIdParameter_ThrowsException()
    {
        ThrowsArgumentException(() => new Song(
            -1,
            this.random.NextString()));
    }

    [TestMethod]
    public void Constructor_ZeroIdParameter_ThrowsException()
    {
        ThrowsArgumentException(() => new Song(
            0,
            this.random.NextString()));
    }

    [TestMethod]
    public void Constructor_NullNameParameter_ThrowsException()
    {
        ThrowsArgumentException(() => new Song(
            this.random.NextGreaterThanZero(),
            null));
    }

    [TestMethod]
    public void Constructor_EmptyNameParameter_ThrowsException()
    {
        ThrowsArgumentException(() => new Song(
            this.random.NextGreaterThanZero(),
            string.Empty));
    }

    [TestMethod]
    public void Constructor_ValidParameters_SetsIdProperty()
    {
        // Arrange
        int id = this.random.NextGreaterThanZero();

        // Act
        var song = new Song(id, this.random.NextString());

        // Assert
        Assert.AreEqual(id, song.Id);
    }

    [TestMethod]
    public void Constructor_ValidParameters_SetsNameProperty()
    {
        // Arrange
        string name = this.random.NextString();

        // Act
        var song = new Song(this.random.NextGreaterThanZero(), name);

        // Assert
        Assert.AreEqual(name, song.Name);
    }

    private static void ThrowsArgumentException(Action action)
    {
        try
        {
            action();
            Assert.Fail();
        }
        catch (ArgumentException)
        {
        }
    }
}

Your test code should be of the same quality as your production code so that you can easily make a change when needed. It takes a bit longer to write production code using TDD but it is worth the investment on the long run. TDD gives a safety net which makes you confident when changing your production code. It is also a way to document it. You should be able to read tests and understand what’s happening.

My next article will be about mocking objects using Rhino mocks.

I hope this article will be useful to someone out there on the web.